Using the software |

|

|
|
Using the software |

|

|
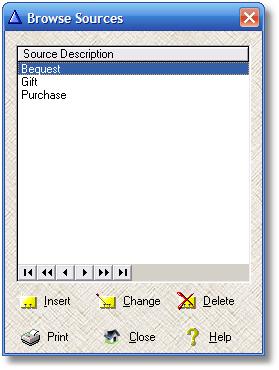
The Museum Archive software package uses a simple interface to help you enter, locate, and maintain your information. Information is presented to you in a list box format, enabling you to browse through the information on file quickly and easily. Once you locate the specific information you are looking for, you can easily view or edit the details in another window containing a form. Here is a sample browse list box:

When you want to enter a brand new piece of information, you simply click on the Insert button. The software will automatically file your information in the correct location according to the sort order, so you don't have to be concerned with positioning the item within the list.
To edit or delete some information in the list, you first must highlight the information that you want to work on. The browse window containing the list box has some built-in functionality to help you quickly locate the information.
•You can click on the column header to sort the list by that column. Click once for ascending order (+) or click twice for descending order (-).
•You can begin to type the information you are searching for and your position in the list will advance to match what you've typed. On simple lists (such as the example pictured here), you type the first letter - such as P to find Purchase. In more complex browse list boxes, you can type more than a single letter, and the position of the list will change with each key stroke. These more complex Locators are displayed on the list box.
•You can use the VCR type button at the bottom of the list box ![]() to quickly navigate through the list. Here is what each VCR button means, from left to right: Go to beginning of list, go up a page, go up a line, go down a line, go down a page, and go to the end of the list.
to quickly navigate through the list. Here is what each VCR button means, from left to right: Go to beginning of list, go up a page, go up a line, go down a line, go down a page, and go to the end of the list.
•You can use the PageUp and PageDown keys on your keyboard.
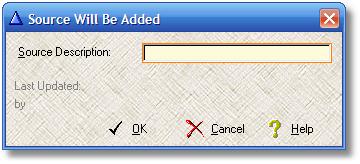
Both the Insert and Change buttons will open up the appropriate form. Here is the form that will open if you want to Insert a new piece of information into the list box pictured above:

Required fields on the forms are shaded a pale yellow to help you distinguish them from optional information slots. When a field has the focus (that is, when the cursor is in the entry box for the field), the outline of the required field is shaded slightly orange - another visual clue that the field cannot be empty.
It is standard Windows behavior to use the Tab key to move between fields, and that is the way this application works. Some software lets you also use the Enter key, but that is not practical in this app. There are too many multi-line entry fields (text boxes) and too many look-up buttons to allow the Enter key method. Use the Tab key in combination with the mouse for navigating within a form, and use the Enter key to accept a value or a button. Obviously, you can also click on a button with the mouse.
Some fields have small look-up buttons to the left of the entry field. These buttons, when clicked, will open up a list box from which you can select the appropriate value. This look-up feature is an easy way to enter information, and at the same time it helps make sure that the information being entered is valid. These look-up list boxes contain information that you design and maintain; see the section on supporting information in this document.
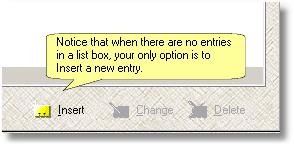
The browse list box buttons will only allow you to change or delete a list box entry if you have it highlighted. When the browse is empty, the Change and Delete buttons are inactive (grayed-out).

The software makes extensive use of look-up tables, and most of the time the use of a look-up entry in an Object will limit what you can do to the item used as a result of the look-up. For example, if an Object has a Source of Purchase (from the table shown above), you will not be able to delete the Purchase item from the Source browse list box. The Purchase Source is in use, and to let you delete it would wreck the integrity of the database. In general, this is not a problem - you are free to add as many Sources as you need. There is seldom a real need to delete a piece of Supporting Information. If you try to delete something that is in use, the software will stop you and display a reason:

You can edit (Change) the look-up item, and your changes will cascade through the database. For example, if you change Bequest to Left in Will, every Object that once had a Source of Bequest will now have a Source that says Left in Will. Try not to change look-up information that has been heavily used, except to correct spelling errors, otherwise you might inadvertently be changing the meaning originally meant by the original entry. This has happened in some other software application: rather than create a new entry for a Judge in a legal database, the data entry clerk simply changed the existing Judge Smith into Judge Jones, wiping out thousands of references to the actual Judge who heard all of those past cases. Make as many new Supporting Information items as you need; there is no need to recycle the old entries.
Good Practice: Be polite and close those forms as soon as you can!
This is a multi-user application. If you are not the only user of the software, it is a good practice to finish working on a window (such as the form shown above) so that it closes. Other users of the system might also be trying to add information at the same time, and while the system is designed to handle this circumstance, things tend to run more smoothly when you don't go to lunch in the middle of a data update.